If you have installed Microsoft flight simulator X make sure that you have installed at least service pack two. Microsoft flight simulator is always developed to run on computer hardware at least 2 to 3 years from its initial release date. Even 5 years later on, if you were to drag all the visual and performance sliders all the way to the right you would suffer big frame rate dips at busy airports.
Despite the fact that updates to Ms flight simulator 10 have halted, the release of add-ons means that Microsoft flight simulator will continue to get more realistic and accurate as time passes.
The terrain mesh quality in Microsoft flight simulator is upgradable via various add-ons and this significantly enhances the flying experience. The world that is drawn in Microsoft flight simulator is modelled after wireframe meshes. This wire mesh determines how accurately the world is rendered when textures are overlaid on top of it. In short these terrain mesh is tell Microsoft flight simulator how tall or deep terrain features are when being presented to you. This mesh data is used to create a 3d model of terrain features such as hills, mountains, cliffs, plateaus, valleys etc.
The default resolution of this terrain mesh data can be quite low in country and non-populated areas. If you are a bush flier than the accuracy of this terrain mesh affects both the realism and enjoyment you get when terrain spotting. If you like to fly low and slow than how accurate those mountains and hills are compared to the real world depends largely on the resolution of those meshes.
In the United States that terrain mesh is set at 38.2m. What this means is that a sample of the grounds elevation is taken at every 38.2m. You will be happy to know that you can now buy add-ons which improve his resolution up to 10m. This means that now elevation data is recorded every 10 m. Now instead of flying through hills and mountains that look smooth out, cliffs will actually look jagged and terrain features that are normally loss become much more apparent.
The best way to find terrain mesh add-ons for your area is to start a search on Google. Because the size of terrain mesh is are generally very large, they are split into geographical regions such as America or Europe. You can find meshes as either payed or freeware. In general payed meshes will offer you higher resolutions and meshes for more faraway locations. Regardless, a terrain mesh upgrade will make a real tangible experience for those that want to practice flying VFR and navigating using key landmarks.
Upon having your terrain mesh updated the next task is to further improve the default terrain textures. These terrain texture updates can either be downloaded for free or you can buy add-ons which greatly improve the visual appearance of Microsoft flight simulator 10.
I have been flight simming since the early release of Microsoft flight simulator. I am an avid flier on Microsoft flight simulator. Before I invested in add-ons and made sure I had the right flight controllers to really simulate flying properly. The thrustmaster warthog or the Logitech G940 is great for those that wish to fly jet planes just like they do in real life.
Tuesday, January 17, 2012
Monday, January 9, 2012
Diablo 3 Release Date
Diablo 3! Man I have been waiting ages for this game to come out and it looks like it will be here sooner rather than later.
diablo 3 release date
diablo 3 release date
Thursday, December 22, 2011
At a little bit of HOTAS action to your joystick
If you currently own a capable joystick but just like me wanted a separate hands on throttle unit then as ch products pro throttle usb might be the solution you're looking after. At the end of the day I decided to get this pro throttle to sit me out until I could find a HOTAS controller which
I actually liked. Previously, I have owned the CH product fighter stick that so it was a bit of a no-brainer to add this pro throttle on. Also if you look carefully on the market there are actually no throttle units which you can buy separate from the joystick. It is not about unit, however it is missing some cool features that are lot of other throttle unit is already have on them. Probably the biggest glaring difference, is that this pro throttle is a slider and it is only a single axis. I fly DCS warthog and those planes have dual engines on them so dual throttle lever HOTAS is really required. The second biggest problem with the pro throttle is that it does not have any trim knobs or trim axis on the handle of the throttle itself. Although there is an option to use digital trim some analogue pots would have made this unit perfect. Although there are some third-party mods you can do to add these analogue trim pots on I find it annoying to have to resort to modifying my pro throttle. It looks like on the horizon though, CH product may release a dual lever throttle until that comes out I am going to have to stick it out with the pro throttle. To be honest my only other option is to fight the vitally more expensive Thrustmaster warthog controller. I decided to purchase this pro throttle unit and you can be more about my full ch products pro throttle usb review
Resource Links
The Flyers Blog
Saitek Pro Flight System Thoughts
The Saitek have recently released their Cessna range of flight controllers. At the moment it is actually quite expensive. However previously Saitek have released their own saitek pro flight yoke system which you can pick up for quite a bargain nowadays. The question of course is to go with the new Cessna yoke or save a little bit of money and get something slightly older are just as good. I've had a good look at those products, in my mind there are some differences but it's more a question of trade-off. Both yokes have advantages and disadvantages. Firstly the Cessna yoke is the only Saitek yoke that fully supports 90° of rotation on both the left and right side. For some reason yokes previous to this only supported up to 45° angle. Compared to a real joke having 90° on your flight controller brings you see much closer to a realistic set up. In practice how ever 45° is adequate to give you the kind of control you need. Similarly, the Saitek pro flight yoke has a embedded clock on the yoke itself which the Cessna yoke does not have. In terms of performance both are made using a steel shaft. Indicators are that the internal mechanisms are probably the same except for the extra rotation degree on the Cessna yoke. Apart from those differences, both come with a flight throttle quadrant. In terms of pricing the older Saitek pro flight system will save you at least $50. I guess it was me I would probably go with the new assassinate yoke just so that I can give you 180° of turning freedom a go. If you have the choice of which would you choose? I found a really good saitek pro flight yoke system review on this website, I think they did a Cessna your reviews too but I am not sure.
Resource Links
The Flyers Blog
Resource Links
The Flyers Blog
Building my own home cockpit. How do I mount my monitors?
Ever since I got myself some flight controller gear, it's been a constant struggle trying to see how to set up all this gear in a manner that would make flying more enjoyable. I have a computer table at the moment which on their sets three LCD monitors. The setup is in great as one of these monitors is actually touchscreen. What I wanted to do was put the 23 inch touchscreen under my main 27 inch Dell monitor. In programs like DCS warthog I want to push all the flight instruments down on to the touchscreen and reserve the upper main screen as the HUD. The problem comes with the fact that my computer table does not allow me to place my 23 inch monitor under my 27 without investing in some serious LCD mounting brackets. Alternatively I've noticed that Saitek have recently released a whole bunch of flight panels such as the. saitek pro flight switch panel the greatest thing with the flight panels is that it slots on top of other Saitek hardware. The flight panels themselves are not very big so if I went and purchased a flight panel I could just mount it straight on top of my computer desk. However it would be great if I could just find a way of feeding in my touchscreen monitor. That way whether or not I play a civilian or military simulator I always have a touchscreen that can act as an interactive panel. Back to the drawing board, I saw some holes in my desk before ever spending too much money on proper LCD mounts. If by chance you happen to be interested in getting some Saitek flight panels I found a review of one of them here saitek pro flight switch panel review
Resource Links
The Flyers Blog
Resource Links
The Flyers Blog
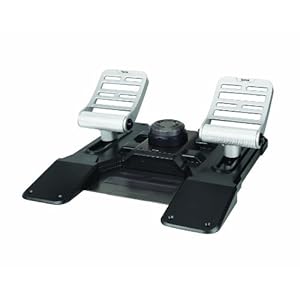
Why I decided to go for Saitek instead of CH products for pedals
I spent ages searching on the Internet to decide which of the two flight rudder pedals I should buy. It was a hard decision to make and I spent many hours pouring over review websites and forums to make the best informed decision. On one hand I wanted a CH products rudder pedal because it would integrate perfectly with my other CH product gear. If you ever have used CH products control software you know just how great it is to be able to use that program to switch between flight profiles. One of the biggest advantages is that you can combine three controllers into one virtual control. You'd be surprised even in this day and age developers still release video games they can only support one controller at a time. At the end of the day I ended up getting the Saitek flight combat rudder pedals. The main reason was that it had a adjustable tension spring, and according to reports on the Internet the spacing between the pedals was much more generous. The biggest factor however was that the Saitek rudder pedals allows you to rest the balls of your feet on the ground. This is by far a much more realistic simulation or flight rudder pedals in real aircraft. With ch products pro pedals your foot actually rest suspended on the pedal at all times, this is neither realistic or ergonomic as having your foot propped up over time can make it tired. Now that I have the Saitek flight rudder pedals I am happy with my purchase. Although I wish that I could combine it with my other CH product gear into one virtual controller the only game that so far I wish it worked with is battlefield 3. All other video games especially flight simulator is tend to support more than one controller at a time which means I generally don't have problems. If you are still interested to find out more and then may appoint you choose this great review ch products pro pedals review
I really like flying with my new CH product eclipse yoke
Previously I was flying Ms flight simulator utilizing a bad aged joystick. The joystick cost me about $20 and I got it in my neighborhood video game shop. I don't really understand why but after half an hour of flying on that thing my hands would get so painful. The main reason why? The springs on the joystick was much too strong. Since moving to a good flight yoke my flight experience continues to be better than ever. The only really thing that the CH Products Eclipse Yoke is those rudder pedals. They are made to be used by your own thumb. In practice I have found them totally unreliable. As well as there is a unusual calibration error where the control value spikes and also the pedals have difficulty saying centred. Nevertheless the CH eclipse yoke is a good flight yoke. Recently I was on the Internet, and I found out that it is possible to purchase specialised springs to change the tension on the yoke. At the moment at the extremities the yoke requires a lot of force. When flying a plane you normally want to be up to make little quick adjustments with just one hand. Because the springs on the eclipse your car a bit too strong it's hard to get full deflection unless you use both of your hands. I've not installed the springs yet as removing the sticker boys your warranty, I wait maybe another year before I open the baby up. If you want to gather more information please read my CH Products Eclipse Yoke review.
Subscribe to:
Posts (Atom)